Push Your Xcode Project to GitHub in Under 5 Minutes – iOS Dev Guide
When you’re developing an iOS app with Xcode, one of the smartest things you can do early on is implement version control. Unfortunately, many beginner iOS developers overlook tools like Git and GitHub, not realizing how vital they are for protecting their codebase.
Think of GitHub as your project’s safety net. Whether your Mac crashes, you accidentally delete files, or face something as serious as ransomware, having your Xcode project backed up to a remote GitHub repository means you’re always a pull away from restoring your progress.
Table of Contents
- Step 1: Sign in with your GitHub account in Xcode
- Step 2: Creating a GitHub repo for your Xcode project
- Step 3: Uploading the Xcode project to GitHub
- Frequently Asked Questions
Step 1: Sign in with your GitHub account in Xcode
While you can manually create a repo and upload files to it, Xcode can automate things quite a bit.
If you connect Xcode to GitHub, you can use the version control tools directly from within the project. Whether you use Xcode for Apps or Unity for 3D iOS games, version control is a crucial step in any project lifecycle.
- Navigate to Xcode -> Settings -> Accounts tab
- Click the + button in the bottom-left corner
- Select GitHub from the list that appears and click Continue.
- Click the Create a Token on GitHub button
If you’re already logged in to GitHub in the browser, this will open a new tab that takes you directly to the Tokens section.
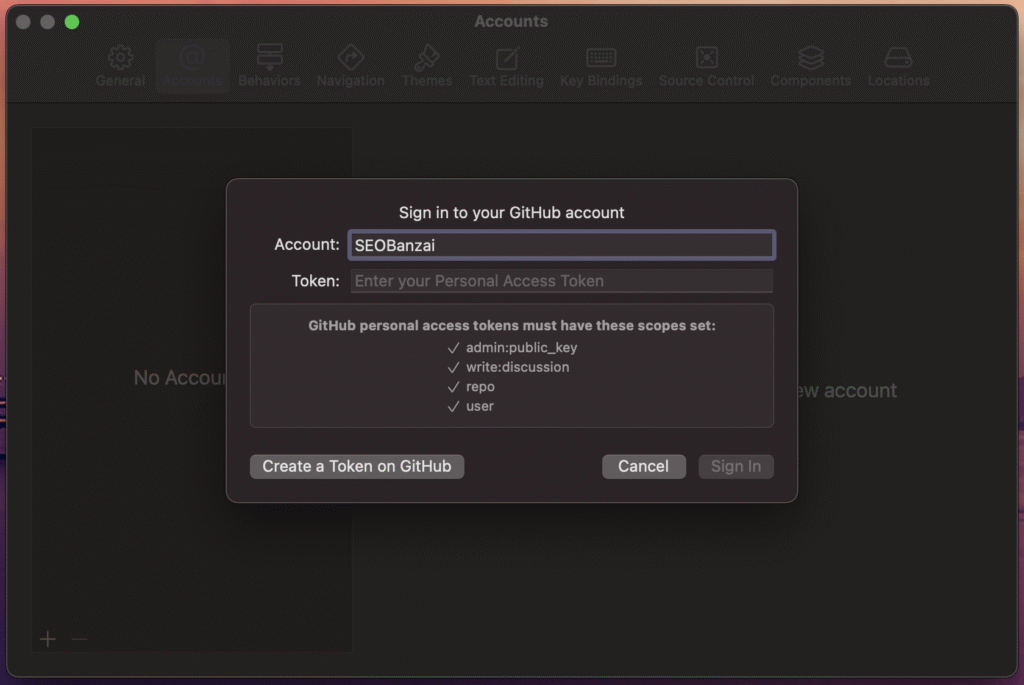
Give the token a descriptive name, like Xcode Version Control Token, then check the permissions the token has. The minimum required permissions for Xcode are the following sections:
- repo
- user
- admin:public_key
- write:discussion
Make sure all these sections are checked before creating the token, otherwise, Xcode won’t be able to properly manage the repos it creates.
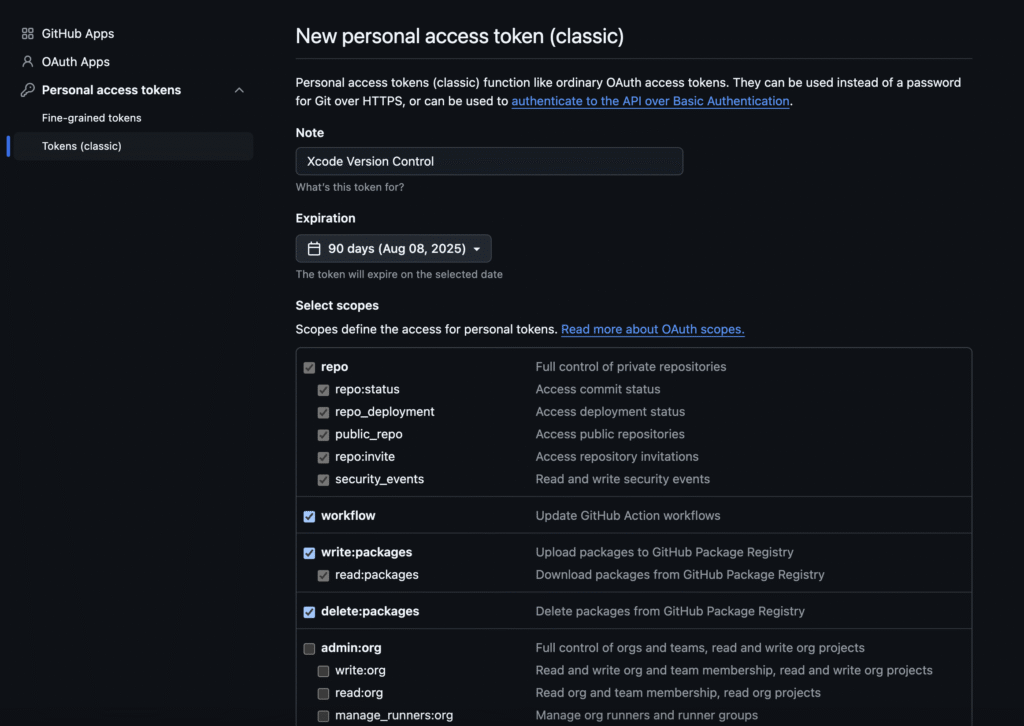
After you create your GitHub token, make sure to copy it right away. GitHub will only show the token once—if you close the page without copying it, you won’t be able to see it again.
Once you have the token, go back to Xcode’s GitHub Sign In window. Paste the token into the Personal Access Token field and click the Sign In button. The account should now be visible in your Xcode list.
Set up the Source Control options in Xcode
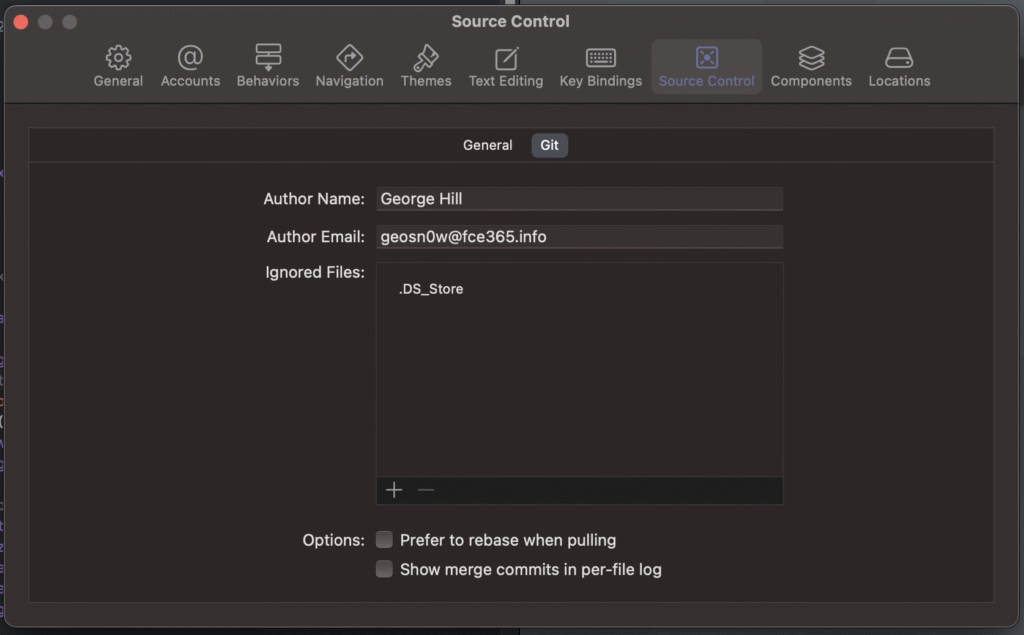
Before you can create your first repo and upload your Xcode source code to GitHub, you first need to configure Xcode’s Source Control properly.
- Navigate to Xcode -> Settings -> Source Control tab, then Git
- Fill in the name (preferably the one you use on GitHub)
- Fill in the e-mail (use the same one from your GitHub account)
- Optionally, add ignore files for .gitignore. Here I usually add the annoying .DS_Store file from macOS so that it doesn’t get uploaded.
Step 2: Creating a GitHub repo for your Xcode project
Now that you have your GitHub account linked to Xcode, you can create a new repository to hold all the project files and changes.
You don’t have to manually create the repo on the GitHub website. Xcode provides great support for managing and creating such repos directly from within the project settings.
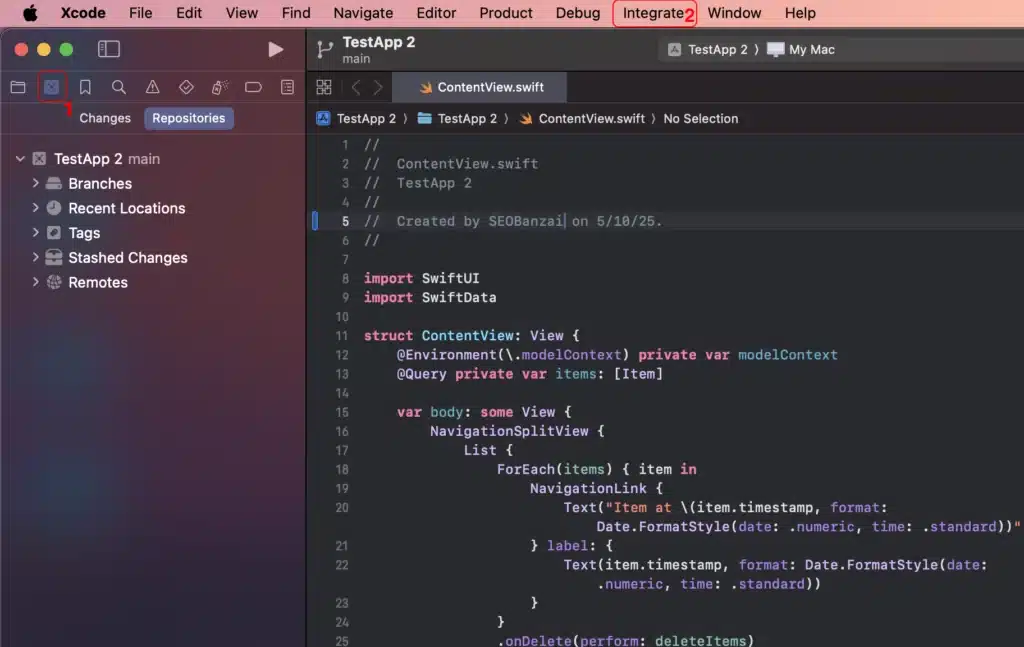
- With the Xcode project open, click the source control icon on the left side just on top of the file tree. The icon looks like a little square safe.
- On the left panel that appears, click the Repositories tab.
- In the Xcode top bar (status bar), click on Integrate -> New Git Repository.
- A window will appear. Make sure the project is checked and click Create.
Creating a new Remote for the Xcode project
Now that you have made the repo, it’s time to create a Remote for it. This can also be done directly from Xcode.
- On the left side of Source Control, you should now see your project. If you expand it, you will see it contains Branches, Tags, and also Remotes.
- Right-click the Remotes option, then New <Project Name> Remote
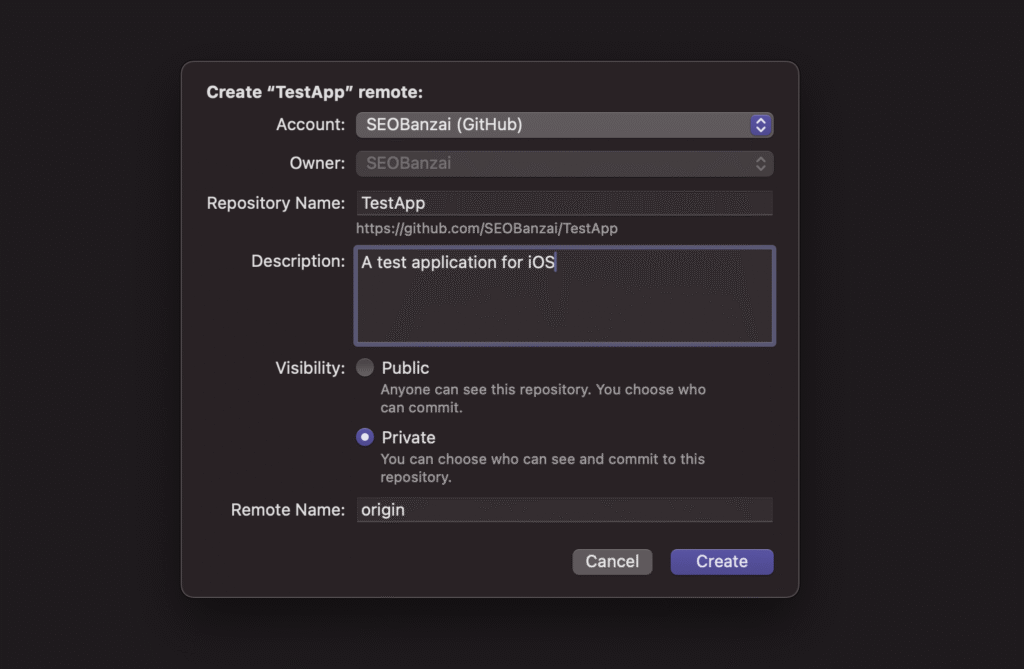
- In the window that opens, you can configure the GitHub repo name, author, description, and whether it is Public or Private. I always set my repos as private until I decide otherwise. It’s best if you wanna prevent accidental leaks.
- Once you’re done setting it up, click Create.
Step 3: Uploading the Xcode project to GitHub
Now that both the repo and the remotes are configured, we can finally push the source code to the repo remotely.
I’ve been developing Xcode apps since 2017, and the very first thing I always do is to set up source control and upload my code to Xcode. It’s a free backup.
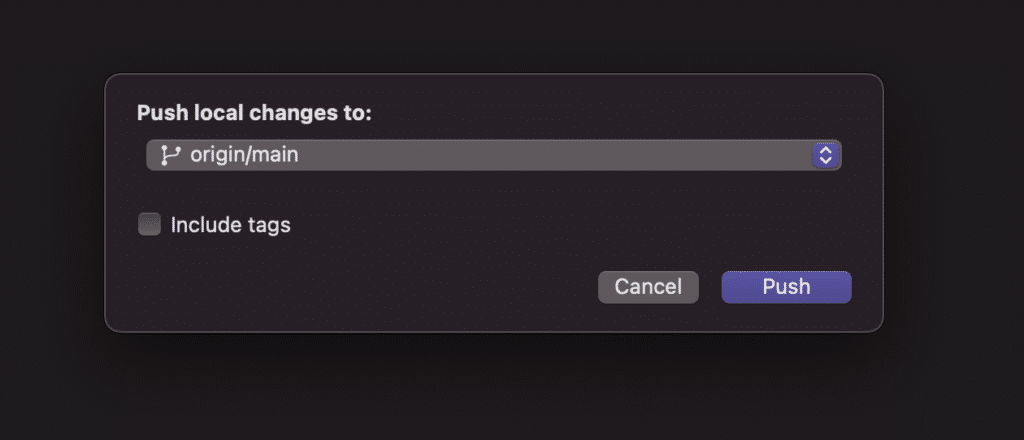
- In the Xcode top bar (status bar), click on Integrate -> Push.
- Select the branch you want to push to (likely origin/main), then click Push again.
- The project should now be visible on your GitHub account. If set to public, the project will also be visible to others.
Keeping the GitHub repo updated with the latest version of the code
Now that the Xcode project is uploaded to GitHub, you have a backup, however, this repo reflects the code at the time of pushing, so any subsequent changes will not be available unless you manually push them.
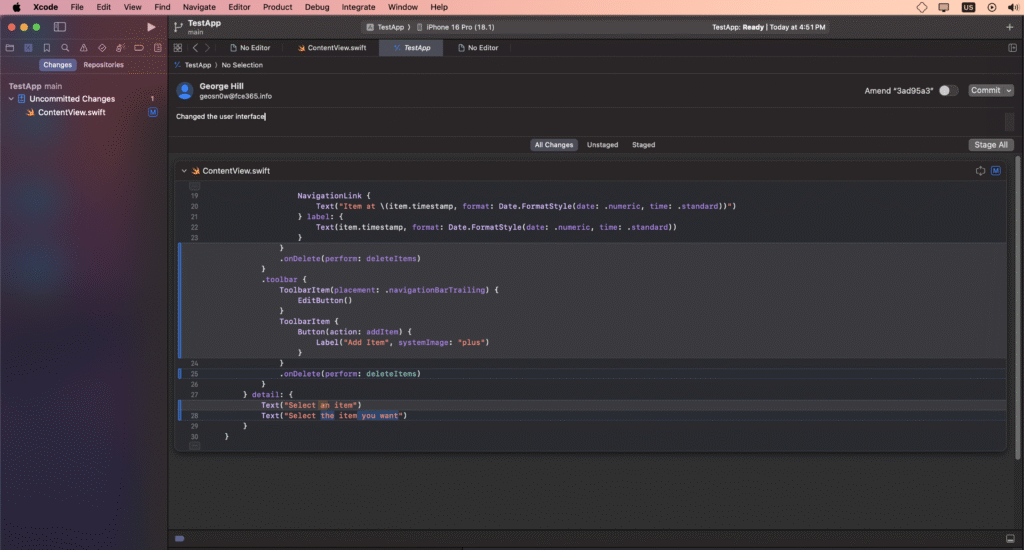
- After you’ve made changes to the project, in the Xcode top bar (status bar), click on Integrate -> Commit to save the changes locally before synchronizing with the Github repo.
- A view will open showing you the modified files and the code that will be uploaded to the GitHub repo.
- Write the commit message (a quick description of what you’ve changed).
- On the right side, near the Commit button, there is a dropdown. Click it.
- Click Commit and Push. When asked, click Stage All and Push.
- Click Push when asked.
If you are more of a visual learner, I’ve prepared a video tutorial on our official SEOBanzai YouTube channel. In the video, I guide you step by step on configuring everything that was discussed in this guide.
Frequently Asked Questions
Do I need to generate a new GitHub token every time I push my project from Xcode?
No. Once you sign in to GitHub using your personal access token in Xcode, your credentials are saved securely in macOS Keychain. You won’t need to re-enter the token unless you revoke it or change machines.
Can I push private repositories to GitHub using Xcode?
Yes. Xcode allows you to create and push both public and private repositories. When setting up the remote, simply choose “Private” to keep your code hidden from others.
What’s the difference between Git commit and push in Xcode?
A commit saves your changes locally to the Git history, while a push sends those changes to the GitHub repository. You must commit first before pushing.
What permissions does the GitHub token need for Xcode to work?
Your personal access token should include at least the repo, user, admin:public_key, and write:discussion scopes. Without these, Xcode may not be able to push or manage your repositories correctly.
You’re All Set!
You’ve now successfully connected Xcode to GitHub, created a remote repository, and pushed your iOS app code. With version control in place, your project is safer, more organized, and ready to scale. Just remember to commit and push regularly as you make updates.
For more iOS and GitHub tutorials, check out SEOBanzai.com or follow us on GitHub for updates!
