In the dynamic landscape of game development, Unity has emerged as a powerhouse, empowering developers worldwide to craft immersive and engaging 3D experiences across various platforms.
This comprehensive guide aims to equip you with the knowledge and tools necessary to navigate the intricacies of Unity, from installation to optimization, enabling you to unleash your creativity and bring your game ideas to life.
Understanding Unity and its Features
What is Unity?
Unity is a cross-platform game engine developed by Unity Technologies, renowned for its versatility and accessibility.
It serves as a robust framework for creating interactive experiences across a myriad of devices, including PCs, consoles, mobile devices, and AR/VR platforms.
Key Features of Unity:
- Cross-platform Development: Unity boasts unparalleled cross-platform compatibility, allowing developers to seamlessly deploy their creations across a diverse array of devices and operating systems.
- High-Quality Graphics: With Unity’s advanced rendering capabilities, developers can achieve stunning visuals, dynamic lighting effects, and lifelike animations, captivating players with breathtaking virtual worlds.
- Asset Store: The Unity Asset Store serves as a treasure trove of resources, offering a vast selection of assets, plugins, and tools to expedite and enhance the game development process.
- Physics Engine: Unity’s built-in physics engine empowers developers to create realistic simulations, facilitating the implementation of physics-based interactions and behaviors within their games.
- Scripting Support: Leveraging the power of C# and Unity’s intuitive scripting API, developers can breathe life into their creations, imbuing them with complex behaviors, gameplay mechanics, and AI systems.
System Requirements and Installation
System Requirements:
Before embarking on your Unity journey, it’s essential to ensure that your system meets the requisite hardware and software specifications:
- Operating System: Windows 7 SP1+, macOS 10.12+, or Linux (64-bit)
- Processor: Quad-core Intel or AMD processor, 2.5 GHz or faster
- Memory: 8 GB RAM or more
- Graphics Card: NVIDIA GeForce GTX 770 or AMD Radeon HD 7970 equivalent or better
- Storage: 20 GB of free disk space
Installation Steps:
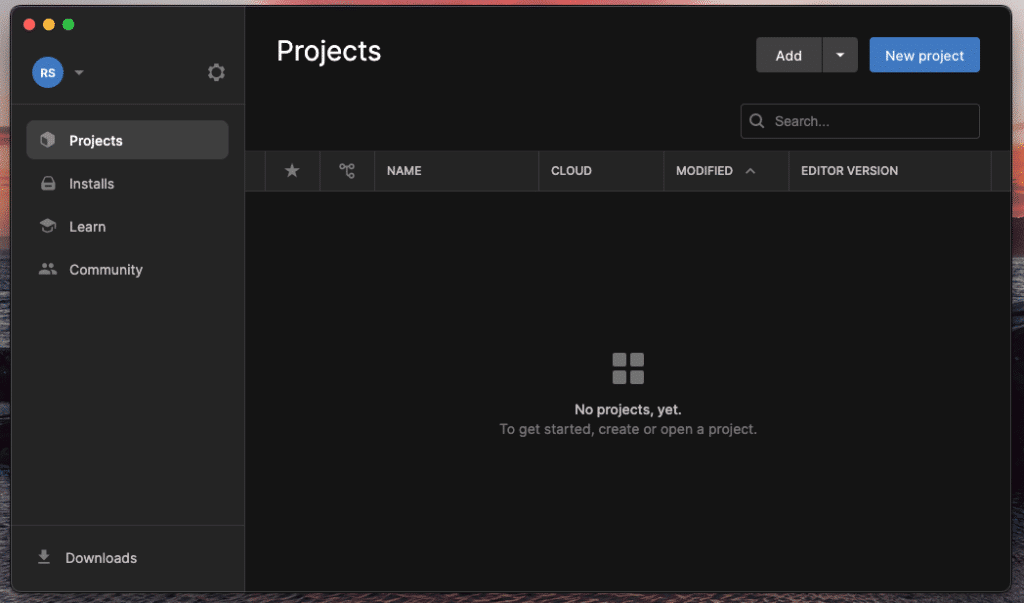
- Download Unity Hub: Unity Hub serves as a centralized management tool for Unity projects and installations, streamlining the development workflow. Navigate to the official Unity website and download Unity Hub, ensuring compatibility with your operating system.
- Install Unity Editor: Launch Unity Hub and proceed to the “Installs” tab. From here, you can select the desired Unity version and installation options. Unity offers several versions, including the LTS (Long-Term Support) and the latest stable releases. Choose the version that best aligns with your project requirements and click “Next” to commence the installation process.
- Activation and License Management: Upon completing the installation, you’ll be prompted to activate Unity using your Unity ID. If you don’t already have a Unity ID, you can create one for free on the Unity website. Unity offers various licensing options, including Personal, Plus, and Pro, each tailored to suit different development needs and budgets.

Setting Up a New Unity Project
Creating a New Project:
- Launching Unity Hub: Open Unity Hub and navigate to the “Projects” tab, where you’ll find a list of existing projects and options for creating new ones.
- Project Configuration: Click on the “New” button to initiate the project creation process. Specify a name and location for your project, select the desired Unity version, and choose a template based on the project type (e.g., 3D, 2D, VR). Unity offers a variety of project templates, each preconfigured with default settings and assets to expedite the development process.
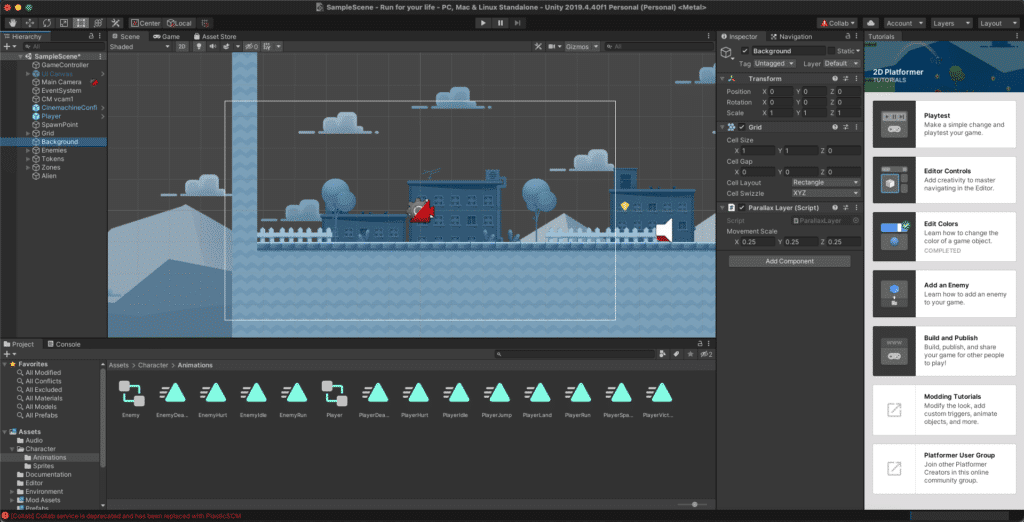
- Unity Interface Overview: Familiarize yourself with the Unity interface, comprising essential elements such as the Scene View, Hierarchy, Inspector, Project, and Toolbar. Understanding the layout and functionality of these components is crucial for efficient navigation and manipulation of your game assets and scenes.
Configuring Unity for 3D Game Development
Graphics Settings:
- Rendering Pipeline Selection: Unity provides developers with a choice between the Built-in Render Pipeline, Universal Render Pipeline (URP), and High Definition Render Pipeline (HDRP), each catering to different project requirements and visual fidelity standards. Evaluate your project’s needs and select the rendering pipeline that aligns with your artistic vision and performance targets.
- Quality Settings: Fine-tune the graphics quality settings to strike a balance between visual fidelity and performance optimization. Adjust parameters such as anti-aliasing, texture resolution, shadow quality, and post-processing effects to optimize the visual experience across various hardware configurations and target platforms.
Physics Settings:
- Physics Engine Configuration: Unity utilizes the NVIDIA PhysX physics engine to simulate real-world interactions and dynamics within the game environment. Customize physics settings such as gravity, collision detection, and material properties to achieve the desired gameplay mechanics and physical realism.
- Rigidbody Dynamics: Utilize Unity’s Rigidbody component to imbue game objects with dynamic physics behaviors, enabling them to respond realistically to external forces such as gravity, collisions, and user input. Experiment with mass, drag, and angular constraints to fine-tune the physical properties of your game entities.
Scripting and Coding:
- Scripting Language Selection: Unity supports C# as the primary scripting language, renowned for its versatility, performance, and extensive ecosystem of libraries and frameworks. Leverage the power of C# to implement game logic, user interfaces, and AI systems, fostering code maintainability and scalability.
- Integrated Development Environment (IDE): Choose an IDE that complements your workflow and coding preferences, such as Visual Studio or Visual Studio Code. Unity seamlessly integrates with popular IDEs, offering features such as code autocompletion, syntax highlighting, and debugging capabilities to streamline the development process.

Asset Management:
- Importing Assets: Populate your Unity project with assets such as 3D models, textures, animations, audio files, and prefabs to breathe life into your game world. Utilize the “Import” functionality within the Project window to import assets from external sources or the Unity Asset Store.
- Asset Organization: Adopt a systematic approach to asset organization, structuring your project hierarchy with folders and subfolders to facilitate asset discovery, version control, and collaboration among team members. Establish naming conventions and file structures to maintain consistency and clarity throughout the development lifecycle.
Best Practices and Optimization Strategies
Performance Optimization:
- Batching and Draw Calls: Minimize the number of draw calls and rendering overhead by batching static and dynamic objects, optimizing mesh and material configurations, and utilizing GPU instancing where applicable.
- Texture Compression: Reduce memory footprint and loading times by employing texture compression techniques such as DXT, ETC, ASTC, or BC7, balancing visual quality with storage efficiency across different platforms and devices.
Final thoughts
Armed with the knowledge and insights gleaned from this guide, you’re well-equipped to embark on your Unity journey with confidence.
Let your creativity soar, your passion ignite, and your games captivate audiences worldwide. The world of Unity awaits—let’s build something extraordinary together!
Credit: Photo by Oskar Yildiz on Unsplash
